First install Certbot
On Ubuntu install using
sudo snap install --classic certbot
On Mac install using
brew install certbot
On Windows, download the installer from https://github.com/certbot/certbot/releases/latest/download/certbot-beta-installer-win_amd64_signed.exe
- Run the installer and follow the wizard. The installer will propose a default installation directory, C:\Program Files(x86), that can be customized.)
- To start a shell for Certbot, select the Start menu, enter cmd (to run CMD.EXE) or powershell (to run PowerShell), and click on “Run as administrator” in the contextual menu that shows up above.
- Run Certbot as a shell command.
After Certbot is installed (you can check if it is installed by running the command certbot –help)
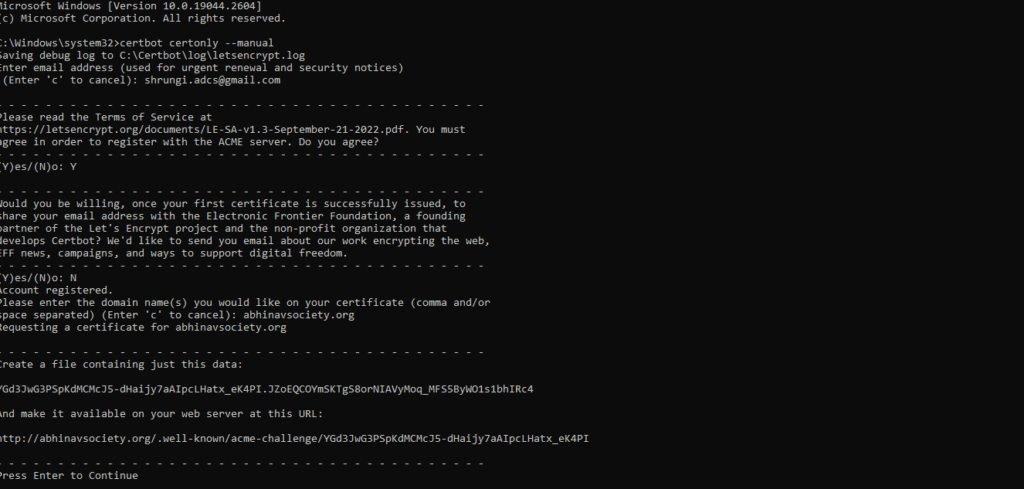
To create a new certificate type this command:
sudo certbot certonly --preferred-challenges http -d <> --manual
Certbot will ask you to sign in and then if the certificate is successfully generated, it will show you some instructions.
Next, open CPanel
Go to File Manager then go to public_html / .well_known / acme_challenge (create the folders if they do not exist)
Create a new file with the name given by certbot, paste the code given by Certbot inside the file (this file does not have an extension) and check if the URL given by Certbot works then press Enter
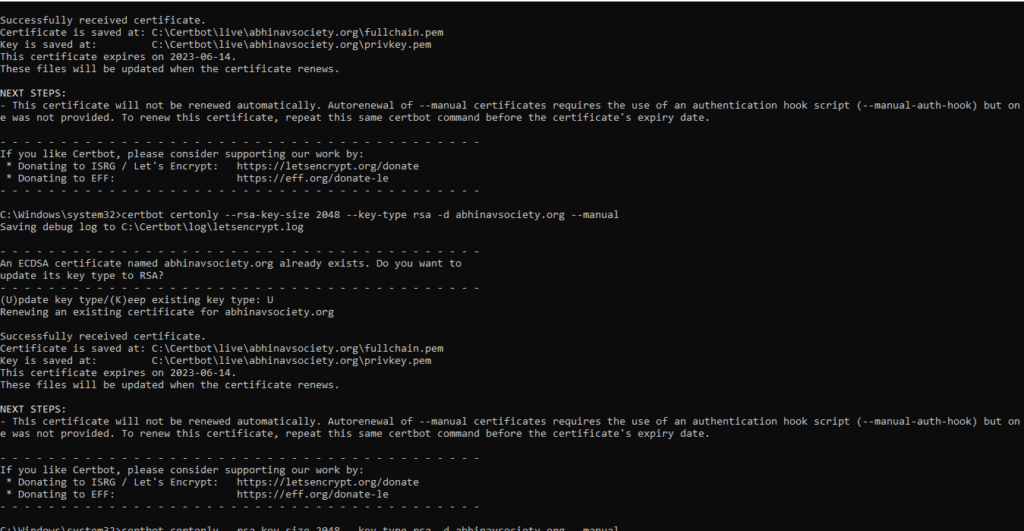
Go to the file path shown by Certbot in the command line to open the SSL certificate
in CPanel search SSL/TLS and open it.
Then click on link of Create/Upload Certificates
Copy+paste the certificate file contents from your computer and then click on
Install Certificate
No go to the SSL Certificates page again and find the certificate you just uploaded. It will be the one by LetsEncrypt and will be of the current date. Click on Install for this certificate.
You will be asked to upload the private key. You can find the private key in the same folder as the SSL certificate on your computer. Copy+paste the contents of the private key and then submit the form.
You will get the successfully updated message
To check if the certificate is working, open an incognito tab on your browser and open your website. Then check if there is a lock symbol before your domain name. If yes then click on that lock symbol -> connection is secured -> certificate is valid
A popup will open up showing the details of your SSL certificate.
That’s it you’re all set.
Please remember that Lets Encrypt offers a validity of 3 months on their SSL certificates so you need to renew the certificates every 3 months.
How to Create SSL Certificate With Certbot Steps
- Open CMD in Administrator Mode
- Open Certbot and run the key
(certbot certonly –rsa-key-size 2048 –key-type rsa -d example.com – -manual)


- Open C Panel
go to File Manager then go to Public_html / .well_known / acme_challenge - Create new file with given name , paste code given by Certbot and check
if URL works then press Enter - Go to the path given by Certbot to see SSL file
- in C Panel search SSL/TLS in that
click below link of Certificate CRT - Upload Cert Certificate file which created in C drive > Certbot > live and upload it and save the changes
- Install Certificate
- Now upload private key (PRIVkey.pem) file which is also created in C drive > Certbot > live and upload it and install
- you get the successfully updated message
- Then go to incognito tab check the Domain name if lock symbol is there click on that > connection is secured > certificate is valid


